- Key Takeaway
- A proper bulk background removal workflow uses a five-stage folder pipeline (input, AI output, QC fails, fixed, final export) rather than processing images one at a time. Run the AI tool on the entire input folder, QC the results against both dark and white backgrounds to catch transparency issues, manually fix the 5–20% that need cleanup in GIMP or Photopea, and re-export as transparent PNG. The folder structure keeps every image's status visible and prevents overwriting originals.
Bulk Background Remover Workflow: Fastest Way to Process Photos (Plus Manual Cleanup)
If you’re removing backgrounds one image at a time, you’re doing it the hard way.
A proper bulk background remover workflow is basically a factory line: you feed in messy photos, the AI tool does the heavy lifting, then you do quick repairs on the small percentage that need it.
This guide shows the fastest real-world method I’ve found — built around offline-first processing, clean folder structure, predictable filenames, and quick cleanup using GIMP or Photopea.

Step 1: Set up your folder pipeline (do this once)
This is the part most people skip. Don’t skip it.
Create a simple folder pipeline like this:
Bulk_BG_Removal/
  01_INPUT/
  02_OUTPUT_AI/
  03_QC_FAILS/
  04_FIXED/
  05_FINAL_EXPORT/
Now your brain stays clean. You always know what stage each image is in.
Tip: Never overwrite files in-place during bulk work. Use stage folders. It prevents mess, and it makes troubleshooting 10x easier.
Step 2: Prepare images for bulk processing (avoid garbage-in)
Background removers aren’t magic. They work best when the subject is clear.
Before you run the tool, do quick sanity checks:
- Crop out useless space where possible (optional but helps)
- Remove obviously broken images (too blurry, too dark)
- Keep the subject roughly centred if you can
- Avoid tiny subjects in huge wide shots
Step 3: Naming conventions that won’t make you hate your life
Use a naming system that stays sortable and avoids duplicates.
Example pattern:
{project}_{category}_{yyyy-mm-dd}_{seq}Example filenames:
pops_marvel_2026-01-20_001.jpg
pops_marvel_2026-01-20_002.jpg
pops_marvel_2026-01-20_003.jpg
If you’re exporting PNGs, keep the same base name:
pops_marvel_2026-01-20_001.pngStep 4: Bulk background removal (offline-first)
This is the main event. Use a tool that can:
- Process a whole folder (not one image at a time)
- Export clean transparent PNGs
- Keep original size (or at least give you control)
- Write outputs to a separate folder
Run the AI tool like this:
- Input:
01_INPUT - Output:
02_OUTPUT_AI - Export format: PNG with transparency
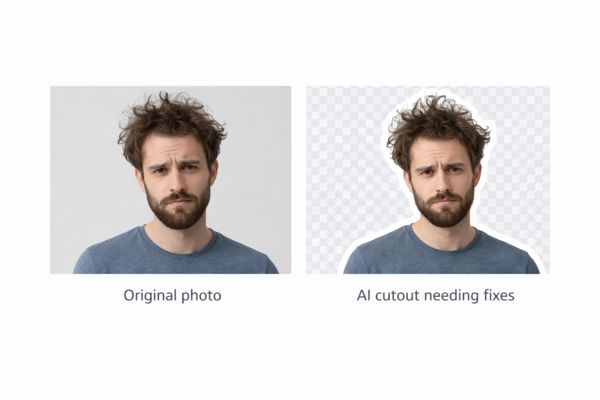
Step 5: Quality check (don’t trust AI blindly)
The fastest way to QC a batch is a black/white background test.
Why? Because transparency issues and messy edges show up instantly.
QC workflow:
- Open output PNGs on a dark background
- Then check again on white
- Anything with bad edges goes into
03_QC_FAILS
Expectations: A good workflow assumes 80–95% of images pass automatically. The rest get quick manual repairs.
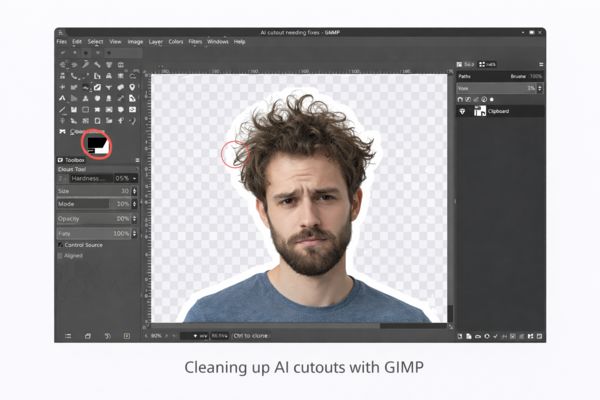
Step 6: Fast manual cleanup (GIMP or Photopea)
Most cleanup jobs are simple. You’re usually fixing:
- holes inside the subject (missing pixels)
- chunks removed from edges
- background leftovers around hair/fur
- random “ghost pixels”
GIMP quick cleanup tools
- Eraser with soft brush for edge cleanup
- Select by Color for removing background leftovers
- Feather selection for smoother edges
- Layer Mask if you want non-destructive edits
Photopea quick cleanup tools
- Eraser + soft edge
- Select & Mask for fine edge refinement
- Brush for repair + painting back missing areas
Step 7: Re-export correctly (avoid the black background drama)
When exporting, always confirm:
- Format: PNG
- Transparency enabled
- No background layer accidentally filled
If you need a white background version too, export separately into a JPG folder:
05_FINAL_EXPORT/
  transparent_png/
  white_bg_jpg/
Step 8: Final batch sanity pass
Before you upload or publish, do a quick final check:
- Open 10 random images
- Check edges aren’t jagged
- Check for halos (light border around subject)
- Confirm file sizes aren’t huge for no reason
If you want to speed this workflow up properly, my desktop app TomsBGRemover is built for bulk background removal (folder in → clean PNGs out).
It runs offline, keeps your images private, and avoids the monthly subscription nonsense.